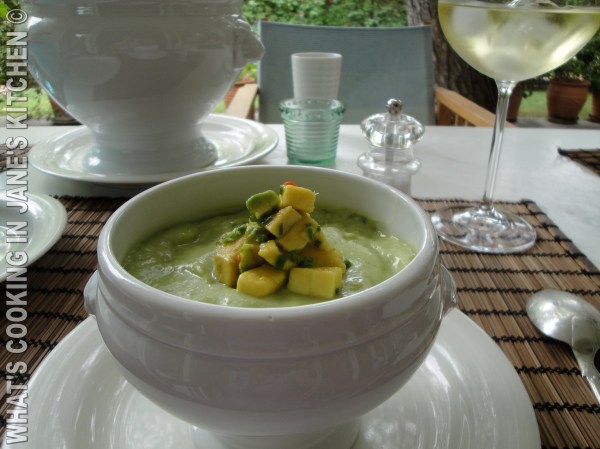
Chilled Cream Of Avocado And Cucumber Soup ©
I just LOVE avocados and the season is here!
This is a wonderful rich, cool, pale green soup, full of goodness and vitamins!
My tree is laden with fruit. I grew it from seed 20 years ago and patiently waited as the trees only bear fruit after 8 years. It was well worth the wait!

My Tree !

2 cartons thick Greek yogurt
3 tbs finely chopped chives or more
2 “very finely” grated lime zests and juice
Salt to taste
freshly ground black pepper
1/2 to 1 fresh green or red chilli always deseeded, very finely chopped
Garnish
1 ripe avocado diced
1 red chilli, deseeded and finely sliced
Juice of 1-2 limes
Zest of 1 lime
1 tbs chopped chives
salt black pepper
Ice cubes: plane, or specially made before hand, with a few drops of lime and a twirl of lime peel placed in the ice cube, or an edible flower-petal, or a coriander leaf.
Method
1. Wash and peel cucumber, cut in half, longways, remove seeds if large, chop into large chunks and place in blender.
2. Add rest of ingredients, (wear cellophane gloves to cut chillies or hold only by the stalk) and lastly add avocados so that they don’t discolour. While peeling, keep as much of the outer green layer as you can. I find this helps in not letting the avocados discolour. Slice avocado into blender and discarding stone. (Once the avocado is added do not delay getting blender working , or avocado will go brown.)
3. Blend until completely smooth, taste for seasoning, one needs to add a lot of salt and freshly ground black pepper and once chilled, it may need more salt and lime juice, the soup should have a definite taste. The lime cuts the richness of the avocado. The soup should also be nice and thick because you serve it with an ice cube, which will thin it down.
4. Serve in a chilled Soup Tureen, or individually in chilled bowls. Add ice cubes at the last minute, other wise as you are carrying the soup to the table, the cube can get lost! Have a bowl of ice cubes ready to add. Finally top with your colourful garnish.
Garnish
1.Prepare this garnish half an hour before, so it does not discolour. Peel and cut up avocado into cubes, grate zest finely and pour over lime juice straight away to prevent the avocado from browning. Add the sliced deseeded chilli. Season well.
2. Serve in a bowl for people to add to their soup.
N.B. This soup can be made the day before, but the very top will discolour. Remove the very top layer with a spoon if it does. For the most vivid green effect, make a few hours before eating. Excellent for using up a glut of avocados from your kitchen garden!
If the avocado is ripe enough, you can peel it by pulling away the skin, this leaves an out side layer of green which gives a greener end result. (See picture.) Don’t use over-ripe avocados, which have gone black on the outside, or inside. The inside flesh should be pale yellow. Like choosing pears, the avocado when it is ripe is just soft when pressed with your finger at the tip or the base.
If you have time, you can chop a few chives into ice cube trays and freeze the day before!
It gives a nice effect when serving!
Bon appétit !
This is what you are aiming for.

Gather your ingredients together, before you begin cooking.
Peel your cucumbers, cut in half lengthwise and discard seeds if large. Roughly chop into blender.
Add deseeded chilli, lime zest finely grated, avocado and lime juice. Season.

If your avocado is just the right ripeness, you will be able to pull away the skin leaving the bright green layer intact underneath. This results in a much greener soup.

Cut fresh home grown chives and wash them thoroughly.

Chop your chives with a sharp knife .

Blend all ingredients.

Season well !

The final result should be thick like this. Once you add your ice cubes the soup becomes thinner.

Garnish with chopped chives red chillies. Add finely sliced limes……

Prepare the garnish, taste always for seasoning.

This is a really delicious garnish and definitely worth the trouble to make as an accompaniment to the soup!

Final Result!
News !

Cyclamen
I am back in town and ready to start a new season of “What’s Cooking In Jane’s Kitchen!”
I began my blog on the 25 rd March 2012 and I thought I would begin the month by sharing with you a page from the inside workings of my blog. Only I get to see this, and of course no names are visible, but this is how I know at a drop of a ‘Click’ that you are all out there.
Two years ago, I didn’t even know how to open a computer. Having grown up for most of my life in a non-electrified house, my expertise were more focused on the art of operating wonderful paraffin lamps, so this magical machine as I call it, never ceases to amaze me, with it’s far reaching capabilities. I also love taking all the photographs, so now that the family are nearly all up up and away, I have found a rewarding pass time to channel my energies!
My blog still runs by word of mouth and link, you will not find me if you search me on the world wide web, so I am particularly thrilled to share with you this long list of countries that my blog is reaching and thank you all once again for your “Views” of,
” What’s cooking in Jane’s Kitchen.”
Feel free to click on the “Follow” button, ( bottom right of page ) if you would like to be informed in your mail each time I post a recipe, or copy paste my link into your ‘Bookmarks,’ for easy access. I usually post twice a week and I aim for Tuesdays and Thursdays, but during high days and holidays, several things come to intervene, so I take a short break and then return full of enthusiasm for my next post.
Comments and questions are always welcome, here and on my Fb, where it is easy to ‘like’ and post a ‘comment.’ I always enjoy your feed back.
As always apologies for any typos or miss- spelling !
Last, but most importantly, a very big “Thank You,” to my dedicated ‘Watermarker’ who returns my photographs on the double and is an invaluable part of my blog and the only way he will let me thank him, is by cooking for him an occasional meal. This is a true friend.
Wishing you all beautiful autumn days and enjoyable cooking! ” My Lemon and Peach Cheese Cake, ” is coming up next!
Best wishes
https://whatscookinginjaneskitchen.wordpress.com/
A PAGE FROM MY BLOG OF HOW I SEE YOUR “VIEWS.”
What’s Cooking In Jane’s Kitchen
Stats for September 11, 2012, 9:58 am
Top Views by Country for all days ending 2012-09-11
- All time Total Views 5,883
| Country | Views |
|---|---|
 Greece Greece |
3,679 |
 United Kingdom United Kingdom |
773 |
 United States United States |
297 |
 Canada Canada |
267 |
 France France |
217 |
 Germany Germany |
122 |
 Belgium Belgium |
64 |
 Botswana Botswana |
61 |
 Netherlands Netherlands |
47 |
 Austria Austria |
46 |
 Czech Republic Czech Republic |
35 |
 South Africa South Africa |
35 |
 Malaysia Malaysia |
32 |
 Ireland Ireland |
30 |
 Thailand Thailand |
24 |
 Italy Italy |
23 |
 Singapore Singapore |
20 |
 Spain Spain |
10 |
 Finland Finland |
9 |
 Switzerland Switzerland |
8 |
 Sweden Sweden |
7 |
 Australia Australia |
4 |
 Philippines Philippines |
4 |
 Israel Israel |
3 |
 Cyprus Cyprus |
3 |
 Peru Peru |
2 |
 Madagascar Madagascar |
2 |
 Egypt Egypt |
1 |
 Denmark Denmark |
1 |
 Lithuania Lithuania |
1 |
 Lebanon Lebanon |
1 |
Summer Melon Fruit Salad ©
As we go into the lovely month of September, Kalo Mina to you all and I hope you all had a good summer!
This recipe is a wonderful melon bowl of fruit, which we learnt to make at Cookery School and I have made countless times ever since. It has the surprise element of taking the lid off, to reveal the delicious fruit inside and you can choose any combination to fill your melon bowl.
Placed on a plate of Mulberry leaves and decorated with geraniums, it makes the perfect end, to a hot summer’s evening.

Easy
6 Persons
Special Equipment: Melon Ball Cutters, size 26 and 28
( Alternatively cut the fruit into mouth sized pieces )
Ingredients
1 ripe Melon of your choice 15-20 cm in diameter
4-6 ripe Peaches
15-20 Seedless grapes or Muscat grapes, which need de-seeding
Zest of lime or lemon
A few fine gratings of fresh ginger
Juice of lime or lemon (1-2)
A sprinkling of icing sugar if required, or a tbs sugar syrup, home made: 2 tbs sugar dissolved in 4 tbs water over heat. Add when cool. Add a squeeze of lemon. The syrup method guarantees the fruit will not go brown.
2 finely chopped leaves of Lemon Verbena (opt.)
Decorate with edible flowers: geranium, jasmine,pansy,lavender and Mulberry leaves.
Optional version a la Jane ! : Mix in 2 tbs yogurt and a tbs each of honey and Gin!
Method
Make this 2 hours before serving so that the fruit is really fresh shiny and not shrunken!
1. Choose your fruit carefully, the melon should be a nice color, smell fragrant and be firm, if slightly giving at the stalk, but not too much so, or it will be over ripe and not nice.Reserve out of the fridge.
2.Choose your peaches, one by one too, they should be just giving to the touch, when pressed with your thumb, otherwise you will have to wait a day or two for them to soften, in your bowl at home. Do not wash, until you are about to use them and keep out of the fridge.
3. Wash your melon and trim the stalk neatly. Selecting a sharp serrated knife begin by making your incisions 2/3rd of the way up the Melon, stalk end upper most, so that your melon sits firmly on your serving dish. Your incisions can be as small or as big as you like, I made mine rather large as I was in a hurry! As you cut, make sure you are cutting through to the cavity of the melon, so that the lid comes off neatly, about 2 cm depth. Try to cut around in an even horizontal line.This is not difficult, like all things, the first time you will have to think, but the second time round, it is easier.
4. Once you have cut all the way around, remove the lid and using a spoon, empty out the seeds.
5. Using a ‘Melon Ball Cutter,’ 2 cm in diameter, press down on the melon flesh, cutting side down wards and scoop out your melon balls. Cut the balls close to one another, so as not to waist too much melon. Reserve in bowl. Scrape out what remains, to give your inside a smooth finish. Enjoy the snack of left over melon pieces!
6. Wash your peaches, peel and using a size smaller ‘Melon ball cutter,’ or the same size, repeat the above process.
7. Wash your grapes and if seedless add them to the fruit bowl. If not and the Muscat grapes are more flavorsome, take the trouble to cut them in half long ways and remove the seeds.
8. Try the fruit for sweetness and if desired, sprinkle with a little icing sugar or make up a little sugar syrup.
9. Pour over your lemon or lime juice. This is important, because it stops the peaches from browning, so do it straight away.
10. Place fruit inside melon, filling it so that the lid can sit half open, partly revealing the surprise inside.
11. Place in refrigerator to chill, for 1 hour.
12. Just before serving, remove lid and grate over the fruit the lime or lemon zest and gently mix into the fruit, using a tea-spoon. If done before hand, I find the zest browns…… also add a little grated raw ginger if liked.
13. Finally, sprinkle on top of your fruit finely chopped ‘Lemon Verbena’ leaves and arrange the lid slanting on top.
14. Place three Mulberry leaves on a suitable serving dish to enhance your creation and decorate with edible flowers.
N.B Any fruit can be used, but this combination is ideal and I usually use soft fruit. Strawberries and raspberries would also be suitable, or mango, passion fruit, fresh pineapple……..

Insert your knife at right angles to your melon and cut in about 2 cm deep.

Lift lid carefully off and using a spoon, remove melon seeds.

Pushing melon ball cutter face down, rotate it around until your melon ball cutter is face up and empty
the melon balls into a bowl.
Cut the balls out close to one another, so as to extract the maximum amount of melon.

Move down cutting into the melon, as you go.

Once you have extracted as many melon balls as possible, tidy up the inside, using a teaspoon.

Repeat the same process with your peaches. If you have a smaller sized “Melon Ball Cutter, ” that is ideal.

Try your fruit for sweetness and add a little icing sugar, or make up some sugar syrup if required.

Add your grapes and fill your melon bowl with fruit, enough so that the lid lies on top showing some of the
fruit inside. Place on a suitable serving dish, decorated with three Mulberry leaves and edible flowers.
Place in refrigerator for one hour to cool.

Just before serving lift the lid off and very finely grate with lime or lemon zest and fresh ginger, mix in gently
with a teaspoon. Place lid back on and serve.
Final result!
