Soup à L’Oignon © French Onion Soup ©
As I have mentioned to you before, my dear Grandmother, on my father’s side was what they used to call “Domestic Science Trained,” known today as “Home Economics.” Lately I have been taking a wonderful journey into her beautifully written cookery books, all of which I have carefully kept and I thought you would enjoy her recipe for “Onion Soup.”
Do not be at all put off by all the detail…..I have really enjoyed preparing this as it is one of my favourite soups. For those in a hurry, just hit the ‘ingredients’ and go to the photographs.

Jane E. Worthington!

French Onion Soup is one of the great French delights of life and especially if you have been fortunate enough to try it at 5 a.m. in the small restaurants which surrounded the old market place in Paris, of “Les Halles.” This market closed down in 1971, but “Onion Soup,” lives on and it is traditionally based on caramelised onions and beef stock, served with a crouton covered in Gruyere cheese and baked under the grill in a ramekin.
In times gone by it was seen as a poor mans soup, because onions were always plentiful and easy to grow. One of the traditions began in Paris, when the French merchants bringing in their goods to market, on a cold and icy morning, needed sustaining with a hot and wholesome soup. It then became popular after a night out, for party goers and there was a big resurgence of Onion Soup in the 60’s when there was a renewed interest in French cuisine. My dear father gave me this tip and I was fortunate enough to try the soup at Les Halles, but sadly the market is no longer at Les Halles, as it was replaced by the “Forum des Halles,” a modern shopping precinct! The market, much like Covent Garden in London is now on the out skirts of Paris.
There are many variations to this recipe, but for me the one below works the best. The secret is to sweat the onions first with a little salt, in order to release all the liquid out of the finely cut onion rings and then to let them gently caramelise, over a medium heat until they are mahogany brown. This process must not be hurried, because if the onions burn, it will spoil the flavour, giving your soup a bitter flavour. It is a process that can take 30-40 minutes, but is well worth the effort. The browned onions also give the final colour to the soup and if you ever order a soup and it comes pale in colour, you can know there will not be much flavour.
To enhance the flavour Cognac can be added, or dry sherry. Some french recipes add red wine, Burgundy or Pinot Noir. It is added at the end to “Déglacé,” your saucepan.
This is a special request from my dear friend Jo and I thank her, because I had not made it in a while and we all really enjoyed every mouthful!

Easy
4 Persons
Ingredients
4 large onions finely sliced
50 g butter
1 heaped teaspoon flour
1-1.5 liters beef stock or enough to just cover cooked onions
1/2 tsp brown sugar, if onions are not already sweet
2 tbs Dry Sherry or Cognac
seasoning
4 Slices of french bread
4 tbs grated Gruyere cheese
Beef Stock
1-1,5 Litres water
2 cuts of beef shin bone
2 large onions quartered
4 carrots quartered
celery
1/2 tsp salt
6 black pepper corns
Bouquet Garni ( 1 bay leaf, parsley stalks and fresh thyme).
2 leeks ( opt )
6 mushrooms ( opt )
2 cloves garlic whole ( opt )
Method
The essential ingredient to a good soup, is home made stock. It really does make all the difference! A stock cube is a very poor substitute! Making a stock is not at all difficult and in this recipe, beef Stock is required.
Ask your butcher for 2 or 3 pieces of beef shin bone. ( In my case he only had ribs, but the result was delicious! ) Some people roast the bones and vegetable in a roasting tin first, but I just placed the bones in a saucepan, covered them with cold water and brought them to the boil. After five minutes of boiling, you skim off any dark scum and add your vegetables. Leave to simmer for an hour.
BEEF STOCK
1. Wash and place beef bones in saucepan, cover with cold water and bring to the boil. After five minutes, skim off any impurities/scum with a slotted spoon and add your vegetables. Add more water if necessary. The water should come half way up your pot, 1.5 liters maximum, otherwise your stock will be too watered down.
2. Add your vegetables and seasoning. I added some additional, optional vegetables, which in this case gave a very favourable result. Add your Bouquet Garni, tide together with string and tie to the handle of your saucepan.
3. Leave your stock to simmer, while you prepare your onions.
ONION PREPARATION
1. Peel large onions, cut in half and slice finely.
2. Melt butter in wide saucepan. (The wider the saucepan, the more surface area, thus the onions colour more quickly.)
3. Add onions, toss in butter, add 1/2 tsp salt. ( This brings the liquid out of the onions.) Turn heat down very low, cover onions with a piece of grease-proof paper, place lid on saucepan and leave to gently sweat for ten minutes. You will notice after ten minutes the volume of onion has reduced.
4. Remove lid and grease-proof paper and over a ‘medium’ heat leave onions to sauté, stirring them occasionally until they are a deep mahogany colour. This process must not be hurried, it will take up to 1/2 hour and gives a good colour to your soup. You want your onions to caramelise without “burning” them, because this gives the soup a bitter taste.
5. Once your onions are a deep mahogany colour, giving strong flavour and an appetising colour to your soup, taste onions for sweetness. Add your sugar, if necessary and your teaspoon of flour. Stir to cook flour one minute and add your sherry or cognac. Cook another minute for alcohol to evaporate and finally add your beef stock, which you have previously strained. Important : Add just enough to cover onions, so that your end result is ” Onions with a little liquid.”
CROUTONS AND GRUYER CHEESE
1. Cut four slices of bread (and extra if you wish).
2. Place in toaster, or under grill, toasting both sides.
3. When toasted, spread the one side with a little butter and cover with grated gruyere cheese.
4. Either melt cheese under grill and add to each individual bowl and cover with soup. OR Fill oven-proof bowls with soup, float your toasted bread on the top with the unmelted cheese and place under grill.
Bon Appétit!

This is what you are aiming for.

Choose 4 large onions.

Peel and cut off root.

These are purple onions, but you can also use yellow onions.
All the lovely onion flavour bursting forth!

Wash and place your cuts of shin bone in a saucepan and cover with cold water. Bring to the boil and after five minutes
using a slotted spoon, skim off any scum which has formed.

For this particular recipe, my butcher only had some rib bones. These gave an equally delicious stock.

Wash and peel the vegetables for your stock.

Add to stock pot. Here I added everything together and skimmed off after, but the correct way is to boil your bones first.

Add bouquet garni, made up of bay leaf, parsley stalks and fresh thyme. Tie together with string and tie to side handle
of saucepan. Leave stock to simmer while you prepare onions.

Cut onions in half.

Slice onions finely. I include a little of the root, chopped up finely into cubes for added flavour.

Slivers of onion. The thinner the better.

Toss in butter, sprinkle with 1/2 tsp salt. Cover onions with greaseproof paper and lid. Turn heat down to ‘minimum’
and ‘sweat ‘onions for ten minutes.

After ten minutes remove lid and grease-proof paper and turn up heat to medium. Leave to caramelise, stirring occasionally.
If they begin to stick to base of pan, just scrape pan with wooden spoon, so it becomes clean again. Do not let burn, this
will make soup bitter.

Here you will notice the volume of onions has reduced substantially and a nice golden colour is forming.

After 30-40 minutes you will have attained a rich mahogany colour. Taste for sweetness, add sugar if required.

Add 1 heaped teaspoon of flour and cook for one minute stirring.

Now add sherry or cognac and cook for a further minute to allow alcohol to evaporate. this gets rid of the bitterness
of the alcohol and you are left with the delicious flavour.

Now add your tasty beef stock which you have previously strained. Enough to just cover the onions, so that the final result
is onions with a little liquid. You thus keep a strong flavour. Taste for seasoning. Do add enough salt to really bring all the lovely flavours out!

Prepare your croutons by toasting or grilling your bread. French bread is best, here I have used Greek village bread.
Lightly butter and cover with grated Gruyere. This is the most suitable cheese to use, as it has flavour and goes all stringy.

Now place under the grill and melt. OR alternatively, fill individual fire proof soup bowl. Fill with soup, float toasted
bread and cheese on top and grill under strong grill.

This is when the bread is grilled before hand, ready to be floated on your onion soup.
Final result! Bon appétit !
Profiteroles au Chocolat ©
Choux pastry is one of those wonderful French inventions used when making “Profiteroles,” and “Éclairs,” and the well known “Gâteaux St Honoré.” There are two versions, ‘sweet choux pastry’ which can be flavoured with vanilla sugar and ‘savoury choux pastry,’ which is seasoned with salt and pepper and often cheese and used to make the well known Gougères, French cheese puffs.
“Profiteroles au Chocolat,” are a family favourite, filled with ‘ Creme Chantilly,’ (Lightly sweetened cream) and covered with home made hot chocolate sauce!!!
It may look complicated, but believe me it isn’t! I have added lots of photographs to give you a step by step guide. Cooking students, this is especially for you!

Medium /Easy
Preparation Time: 20 minutes
Cooking time : 35 minutes
Ingredients
Makes 18-20 Profiteroles
50 g plain Flour ( All purpose )
25 g butter
1 egg lightly beaten
1 yolk
1.5 dl water
(1 extra egg for glazing profiteroles)
Creme Chantilly
150 g fresh cream
1 level tsp vanilla sugar
Chocolate Sauce
100 g bitter chocolate 70% cocoa
2 tbs sugar
1.5 dl hot water
50 g butter
pinch of salt
Method
*Oven temperature 230.C/ 450.F for ten minutes, then turn down to 190.C/375.F for a further 15 minutes.
It is important that the flour you use is perfectly dry. If in any doubt, sieve flour onto a sheet of grease-proof paper and place in the oven at 100.C for five minutes. Then leave to cool.
Pre-heat your oven. Place shelf just below centre.
1. Sieve flour onto flat sheet of grease-proof paper.
2. Put the butter and water into a small saucepan and bring to the boil.
3. While it is boiling rapidly, draw aside from heat and immediately pour in your flour all at once.
4. Straight away, beat the mixture hard with a wooden spoon, returning the saucepan to the heat, until the mixture comes away from the sides of the saucepan and forms a ball. Now remove from heat.
5. Beat in the yolk of the egg and then the whole egg which has been previously lightly whisked. It may not be necessary to add all the egg. You want a pliable thick mixture. See photographs.
6. Beat hard until it goes shiny. This could take 2-3 minutes. Best done by hand…..
7. Place in piping bag with “Plain” nozzle about 1.5 cm wide. Pipe small balls about the size of a walnut onto a buttered baking tray leaving 2 cm gap between each one, as they will expand during cooking. Use a knife dipped each time into cold water to cut off mixture from your piping bag.
8. Glaze each ball with beaten egg, using a pastry brush.
9. Place in pre-heated oven at 230.C/450.C for ten minutes and then turn down to 190.C/375.F and cook for a further 15 minutes.
Creme Chantilly
10. In the mean time make up your “Creme Chantilly,” by beating your cream in a bowl, together with a teaspoon of sugar until stiff.
Place in piping bag with very small pipe. (See photograph.) Reserve in fridge until ready to use.
Chocolate Sauce
11. Into a small saucepan place, sugar, chocolate broken into squares and butter. Stir continuously until melted and boil until syrupy, 2-3 minutes, it should coat the back of your spoon. Reserve to pour over profiteroles, just before serving. It needs to be poured over at the last minute, so that the chocolate is warm and shiny!
12. Remove profiteroles from oven once cooking time s up and place on cooling rack. As soon as they are cool enough to handle, 1-2 minutes, make a hole with a sharp knife carefully in the base for the steam to come out and to enable your piping nozzle to fit in.
13. When profiteroles are completely cold, using your piping bag fill with cream, pile into the shape of a pyramid on your serving dish. Decorate with cream and strawberries dipped in chocolate! Just before serving, drizzle with hot chocolate sauce, so that they are served still warm with extra sauce on the side.
N.B. It is important to work quickly and beat hard as soon as you have added your flour and your mixture must come away from the sides of the saucepan. It is also important to make a hole in the base of your profiteroles as soon as possible, once they are cooked to let the steam out.
You can make your profiteroles the day before and once completely cold reserve in an air tight tin. Pipe with cream the next day, but only pour your hot chocolate sauce over the Profiteroles, just before serving!

This is what you are aiming for.

Gather your ingredients together.

Lightly beat eggs to break them up with a fork.

Sieve flour onto sheet of grease-proof paper.

By sieving the flour onto a sheet of paper, you can then add it much more easily to the boiling water and butter and thus lumps will not form.


Yummy!!!!!


Wash strawberries, retain leaves and pat dry with kitchen paper.

Dip into the warm chocolate, about half way up your strawberry.

Allow chocolate to drip off and arrange around pyramid of profiteroles. Three is usually a good number, when arranging, it makes it more interesting than four…..


Final result, perfect for a Birthday surprise!
Chocolate, Raspberry And Cream Valentine’s Cake! ©
“Roses Are Red Violets Are Blue, Sugar Is Sweet And
So Are You! “


Happy Valentine’s Day !
This beautiful cake is waiting to be made for some one special!
Ingredients
3 eggs
100 g bitter chocolate 70 % cocoa
100 g unsalted butter
100 g sugar
1 tbs flour ( Only )
150 g fresh raspberries
250 g whipped cream
1 tsp icing sugar ( confectioners )
For Decoration
Azalea and Rosemary Flowers or other “edible” flowers, roses, pansies jasmine
Oven Temperature : 150.C./300.F
Cooking Time : 40 minutes
Preparation Time : 15 minutes
Method
1. Pre-heat oven to 150.C /300.F. Choose a suitable cake stand or plate to display your cake on. Butter non stick “heart shaped or round” cake tin. 26 cm x 26 cm at widest points 5.5 cm deep. Stand cake tin on a sheet of grease-proof paper and draw round the perimeter with a pencil. Cut out and place this g.p.p.in base of tin to be certain of cake not sticking! Wash raspberries, by placing them very delicately into a sieve and holding under running tap. Arrange one by one hole downwards on kitchen paper to completely drain.
2. Melt chocolate in ‘Bain Marie,’ ( Heat-proof/ pyrex bowl placed over a saucepan of simmering water. The base of your bowl must not be touching the water.)
3. Separate egg yolks from the whites, placing them in two large mixing bowls. Add sugar to yolks and beat until white and fluffy. 3 minutes minimum.
4. While chocolate is melting whip whites to stiff peaks ( at least 3 minutes, or until they stand in stiff peaks. There must be no yolk, which may have fallen into the whites and beaters must be spotlessly clean, or the whites will never go stiff!)
5. Add butter to chocolate and allow to melt. Remove from heat and mix butter into chocolate. Add chocolate to egg yolks together with sifted flour and fold until a uniform color. Fold in stiffly beaten egg whites, 1 table spoon first and then the rest, this makes it easier to be incorporated. Use the usual cutting and folding over method, working quickly so as not to lose air.
6. Turn out in one, by tipping cake mixture out into cake tin with the help of a spatula,this way you lose less air. Place in pre- heated oven with out delay, for 40 minutes. NEVER open oven door during the cooking time of a cake. The clod air coming in, causes the cake to flop!
7. When the cooking time is up, open oven door just enough to insert skewer into the center, if it comes out clean it is ready, if not leave another 5 minutes.This cake does not rise very high and my cake tin has high sides, for making double quantities. The end result is prettier using the above quantities though, because once you decorate it, it has plenty of hight.
8. Leave to cool 3 minutes, run knife carefully around edge, place cake cooling wrack on top of cake tin and holding together tightly, turn out with one swift turn!
9. Peel off paper gently and leave to completely cool. This takes about 20 minutes. Place your hand lightly on top of the center of the cake, to ensure it is completely cold. Place cake serving plate/stand, lightly over the top of your cake and turn cake over onto plate holding onto cooling rack like a sandwich. Remove rack and if you are using round cake tin, fold a sheet of paper in half, draw the shape of a half a heart,( a bit like a large “?” cut out and open out paper heart, place on top of cake, lightly sprinkle with icing sugar and remove paper. Using the line left by the paper, cut using a sharp serrated knife, pointing downwards to form your heart shaped cake.
10. Make sure your cake is centrally placed on your ‘cake stand’ and proceed to decorate with raspberries. Start by making a border all the way around, slightly in from the edge of your cake. Then fill in center.
11. Beat your cream until stiff. Place “Star” nozzle on piping bag, fill bag 2/3 full and twist top of bag. Press bag from top downwards, until cream is just starting to come out of nozzle. Placing your nozzle touching where you want to make your star, press bag, until the amount of cream you want has come through and lift away. If you have not done this before, practice on a plate first. It is not difficult, just be sure cream is stiff and hold your piping bag at right angles to what you are decorating.
12. Finally using a sieve, sprinkle cake with icing sugar and float a few edible petals on top. The rosemary flowers, if you have them fresh in your garden, give a wonderful delicate flavor !
N.B. This cake has very little flour, just enough for it to keep its shape. The result is a very light almost mousse-like cake! DELICIOUS!
Always remember when making a cake, get everything you need ready before, because from the minute you start beating you are adding air and lightness to your cake and any delay, causes that air to be lost. There is nothing like a light cake, a heavy one will not be appreciated! Good Luck!
This is an easy cake, don’t be put off by all the details, those are for my new cooks!
The final result will melt anyones heart!!!


Step by step pictures of how to make this delicious Cake !
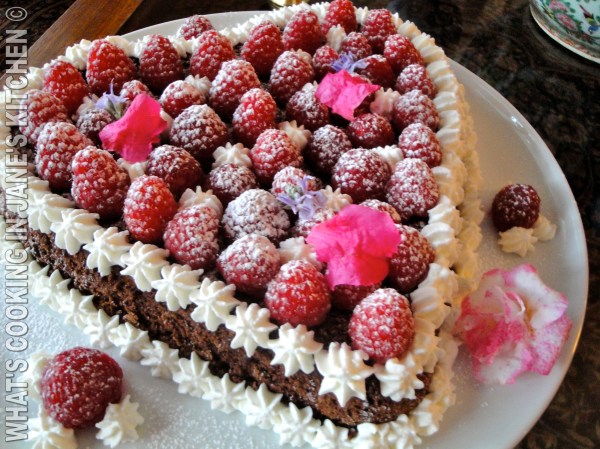
This is what you are aiming for.
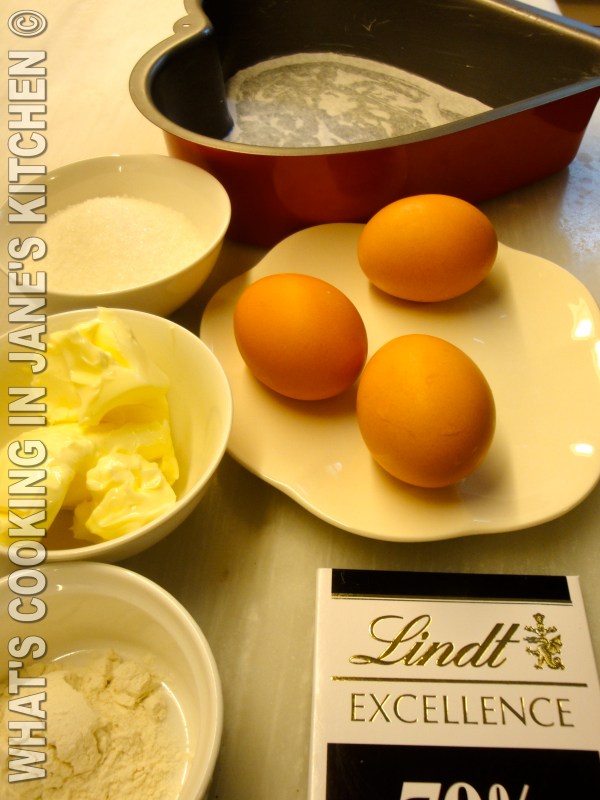
Gather together all your ingredients. Place shelf a little lower from the middle, in your oven and turn on to 150.C/300.F.
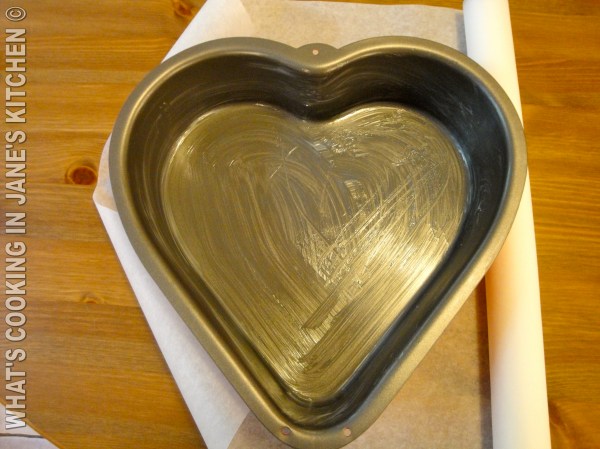
Grease your tin with melted butter. Place tin on a sheet of grease-proof paper and draw around your tin with a pencil.

Cut out heart shape.

Place paper in base of tin. This way cake turns out more easily and you are sure it won’t stick to your tin.

Melt chocolate over “Bain Marie.” ( Heat-proof bowl, placed over saucepan of simmering water.)

Place egg yolks and sugar in large bowl and beat.
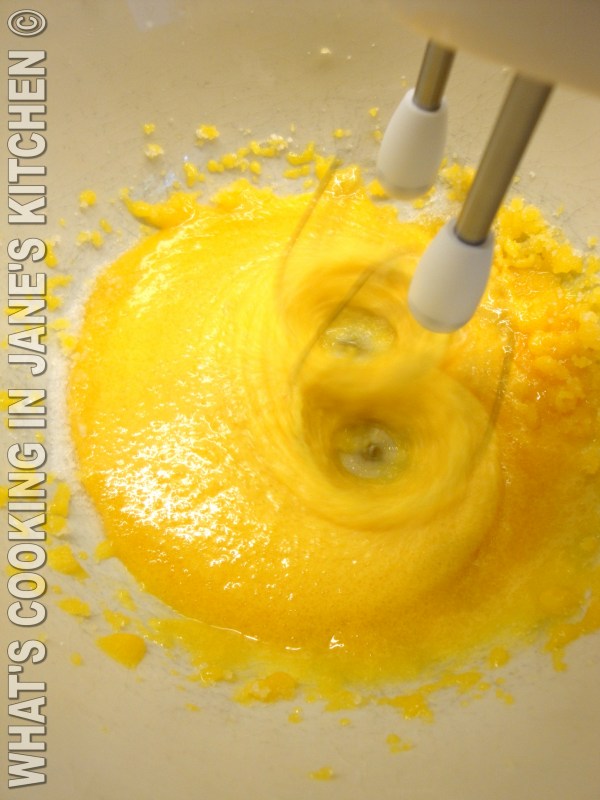
Beat egg yolks and sugar until light and fluffy. Here they are shown at the start of the beating, after 3 minutes
they will have become a much lighter color and be light and fluffy. By beating you add air and thus lightness to
your cake.
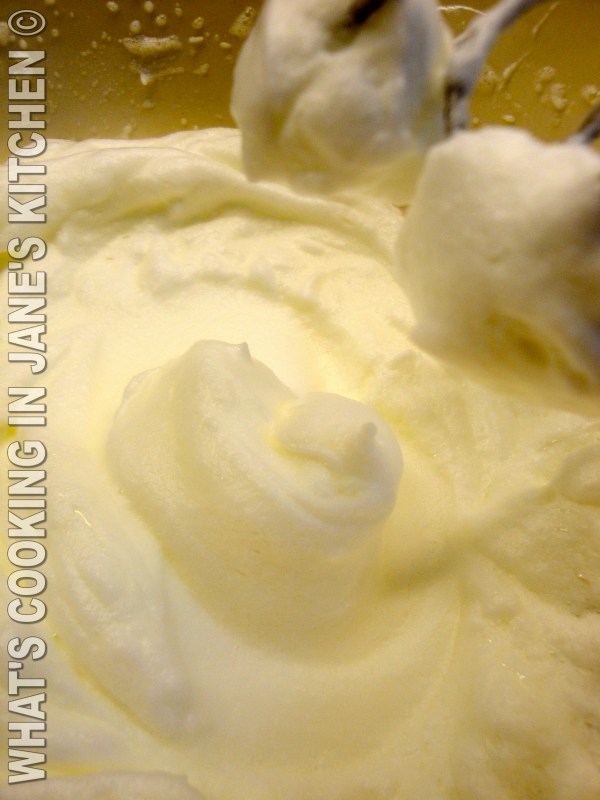
Place whites in large bowl and beat until stiff peaks, 3 minutes. ( Wash beaters very thoroughly before doing this!!!!)

Add butter to melted chocolate and leave to melt. Remove from heat and mix butter into chocolate.
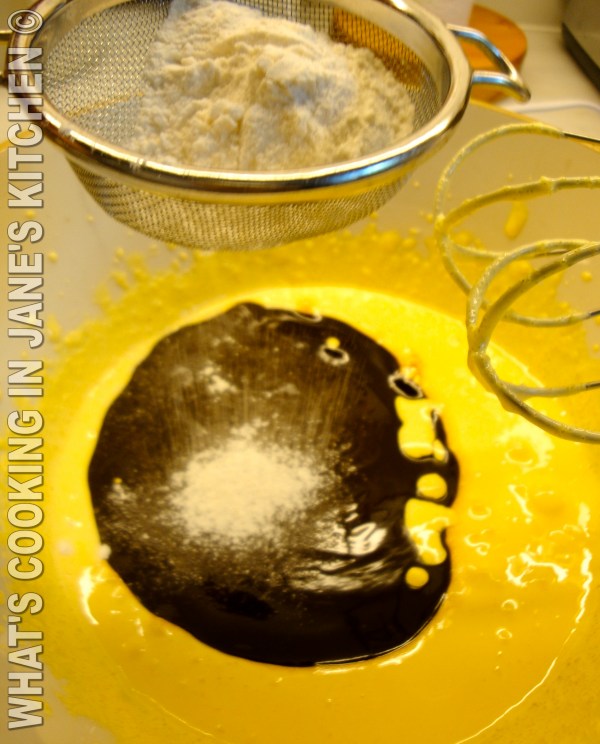
Add melted chocolate and sifted flour to egg yolks.

Fold with large spatula, cutting across, lifting mixture and lightly and quickly folding over, so as not to lose
air, giving the bowl a half turn each time.

Give the egg whites a last minute whip, to be as stiff as possible. Fold in one tbs of stiffly beaten egg whites
and then the rest. (If beaten whites are left to stand they slowly deflate.)

Turn out in one, so as not to lose the air in the mixture, by tipping out your mixture with the help of a spatula.

Even out, very gently with spatula and place straight away into the center of your pre-heated oven.

Oven rack should be placed just below the center, so that your cake is in the center of your pre-heated oven.
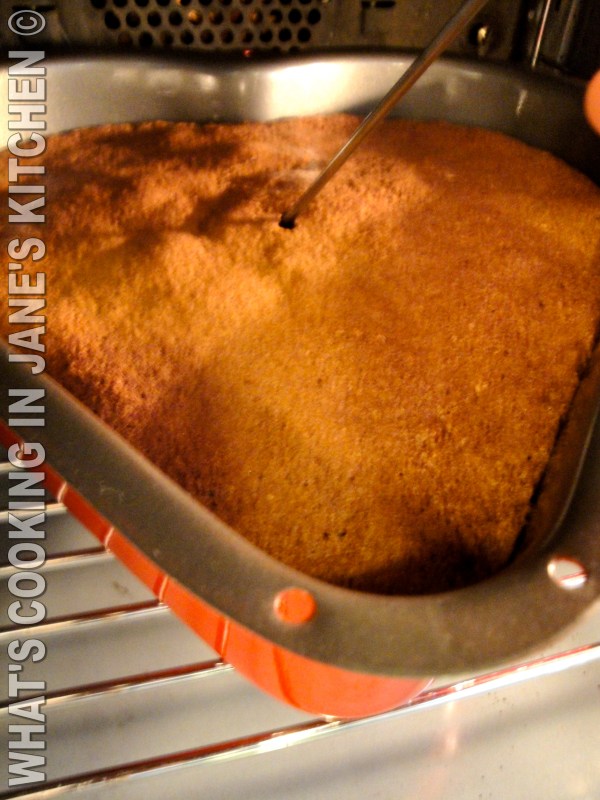
ONLY when cooking time is reached, (40 minutes,) open oven door just enough to place skewer into the center
of your cake. If it comes out clean, your cake is ready, if not leave a little longer, 5 mins and take out.
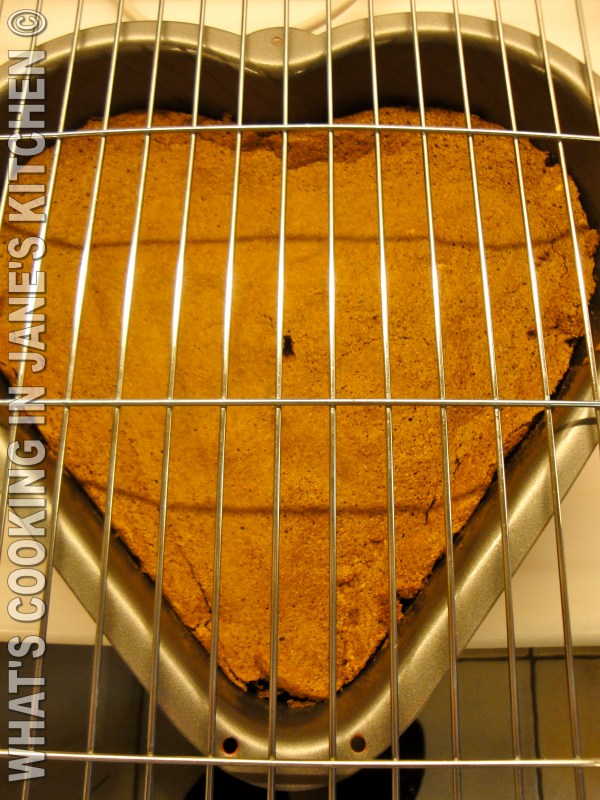
Leave to cool 5 minutes, your cake will shrink away from the sides, allowing you to run a knife around the
perimeter of your cake. Place cooling rack on top and gently holding both tightly together, turn over.
Leave to cool completely. This takes about half an hour. Check with the palm of your hand. It must be
completely cold, before decorating. If you are not decorating straight away, cover tightly with cling film.

Carefully remove paper while still warm.

Whip cream until stiff and add star nozzle to piping bag. Fill piping bag 2/3rds full with cream. Twist top of bag
to push cream down to the bottom.

First place a line a of raspberries around the perimeter, a little in from the edge and then fill the center with more raspberries.

Pipe your stars around the bottom of the cake and then a second layer around the top. Keep those stars nice
and close together for the best effect.

Decorate cake stand with a few extra raspberries and add a few extra stars to the top of your cake in between
the raspberries.


Using a sieve, dust your cake with a little icing sugar and decorate with flowers.

To my wonderful family, to my dear friends, to some very special people out there who are going through some very tough moments and to all you romantics, always have love in your hearts!
Chin Chin and Happy Valentine’s day!
