Oeufs à la Neige ©
For those who like a challenge…….and then I promise to return to easier recipes!
A wonderful combination of Crème Anglaise, Soft Meringue and Crunchy Caramel!
There is some confusion about the name. In French cuisine, the terms œufs à la neige (“eggs in snow”) and île flottante(floating island) are sometimes used interchangeably; the latter is the source of the English name. The difference between the two dishes is that île flottante sometimes contains islands made of “alternate layers of alcohol-soaked dessert biscuits and jam.”
This recipe is one of those glorious French inventions. My mother- in- law is an excellent cook, a talent most French people acquire down the generations, as it is part of their culture. In the good old days, they really knew their recipes and this was one she used to make often. Occasionally I would ask her how she had made something and the reply always came, “Oh it is nothing. ” A quick explanation would follow and the rest was up to me. Well here is one of those recipes where if things go right it really is nothing , but if they don’t oh dearie me……so I call it the perfect exam recipe, as it will soon show up your capabilities as a cook.
I used to give cooking lessons in my kitchen, to a wonderful group of friends and every six months I would choose some challenging dishes for my students to show their progress. I would write the names of the recipes on little pieces of paper and they would pick them out of the bowl. A nice smile would come over their faces as each one opened them up. They knew each time what was required of them and they then had the satisfaction of carrying out what ever piece of theory we had learnt. Even today when I pick up a recipe book, I will read something and think to myself, well it says that, but I will make it the way I have been taught, knowing the pit falls and safety nets.
Now in this recipe, the pit falls, as I call them, firstly are not to “scramble” your custard. Your custard has 4 egg yolks in it and the trick is to add a little thickening agent, flour or corn flour, some times arrow root, to your custard. This helps in it not becoming scrambled. As you are heating your custard in a saucepan straight over the heat, unless you are very patient, it easily gets too hot and in no time separates out. This unfortunately, unlike mayonnaise is irreversible, at which point all you can do is start over, using a totally clean saucepan and fresh ingredients. Keep your heat low and stir continuously, especially around the corners of your saucepan, until it thickens and coats the back of a spoon.This can take up to 15 minutes.
The second challenge is to poach your spoonfuls of meringue on simmering sweetened water sufficiently, so that they do not shrink when you place them on your Crème Anglaise. The trick is to pass a skewer through the meringue, once the cooking time is up and they are only ready, if the skewer comes out hot, when you test it on the back of your hand.
Thirdly the lovely process of making caramel! Here I would like your full attention. Firstly all the sugar crystals, need to have dissolved, BEFORE the water boils. This is achieved by stirring continuously and using a brush to push into your water any crystals that might have remained on the sides of your saucepan. If the sugar has not dissolved before it boils, remove from the heat and stir until the water is clear. Once it begins boiling, you then ‘STOP’ stirring and remove your spoon. You must then watch over it! Soon it will begin to change color. You neither want it so pale that it tastes of nothing nor black, when it will be bitter and give off smoke. You just want to lift it off the heat when it is a nice deep rich brown. Remember, it has become very hot and will go on darkening and cooking from its own heat. To stop this process, you can place your saucepan in a heat-proof bowl of iced water. Leave it no longer than a minute and then pour it over your meringues. ALWAYS WHEN BOILING SUGAR HAVE A LID NEXT TO YOU, INCASE IT CATCHES FIRE! NEVER LEAVE BOILING SUGAR UNATTENDED!!!!( See Fire Safety Notes under “Viewpoint,” in Index.)
The custard and meringue can be made ahead of time, but the last focus point is that you need to pour the caramel over, before serving, half an hour at the most, if done several hours before it becomes soft!
Despite the challenge, you will really enjoy creating this recipe, just choose a calm and un-rushed day!
This can also be served in individual glasses and you can spin the caramel on the top! It looks stunning!


A challenge!
6 persons
Preparation Time: 1/2 hour
Ingredients
Crème Anglaise
4 yolks of egg
135 g caster sugar
300 ml milk
1-2 tsp Vanilla Sugar
1/2 tsp corn flour
Meringue Islands
4 egg whites
100 g sugar
Caramel
100 g caster sugar
100 ml water
Method
Crème Anglais
1. To make your Crème Anglaise/ Custard, separate your eggs into two large mixing bowls. Add to your yolks, sugar and vanilla sugar and work well together with a whisk.
2. Place two vanilla pods in a sauce pan, add your milk and heat, but not to boiling! Heat to just when it begins to give off steam. If you add instead the inner part of the vanilla pod, you do get a speckled effect. The choice is yours.
3. From a hight of approximately 20 cm pour your warmed milk onto your egg yolks. The hight helps to slightly cool the milk before hitting the eggs, so there is less chance of your eggs curdling. Mix well and add your corn flour diluted first with a tablespoon of milk, so it doesn’t go lumpy.
4. Pass through a sieve into your saucepan and place over a low heat until it thickens and just coats the back of a spoon. It will become like a thick cream. This process requires patience and can take up to 15 minutes. You need to constantly stir and resist the temptation to turn the heat up, when in a hurry! That is how I scrambled my first attempt!
5. Pour into serving dish and place in fridge to cool.
Meringue
1. Place large wide saucepan full of water onto boil adding 185 g sugar.
2. Place egg whites in spotlessly clean, dry large mixing bowl. Make sure no egg yolk has fallen in, in which case scoop out using your egg shell half. These are all important points, or your egg whites will not go stiff.
3. Beat until stiff peaks when lifted up by your (switched off )beaters.
4. Add sugar and beat until shiny.
4. Taking a large tablespoon, first dipped in cold water, scoop out a large spoonful of meringue and with the help of a spatula knife drop gently onto your simmering water. Do two to three at a time, as they expand and you don’t want them all running into one another. Cook for 3-4 minutes on each side, using two tablespoons to turn them over half way through the cooking time.
5. Now test each one by passing a metal skewer horizontally through the center. If it comes out hot when tested on your hand, they are ready.
6. Remove with a slotted spoon to drain on kitchen paper. They may shrink just a little, but if perfectly cooked, they should hold their shape. Then place carefully on your Crème Anglaise.
Up to this point you can prepare before hand and keep in refrigerator. Two hours before is ideal.
Caramel
*This should be prepared and poured over, 1/2 an hour before serving, otherwise the caramel softens on your Crème Anglaise. It is best crunchy!
1. Place water in small saucepan and add sugar.
2. Place over medium heat and stir until “all” the sugar crystals are dissolved. To make sure of this use a pastry brush to remove any crystals from the sides of your saucepan.
3. When the water is clear, “remove your spoon,” and turn up the heat. From the minute it starts boiling,” do not stir.” ****Have saucepan lid next to you in case of Fire and stay with your saucepan! Once the bubbles start to bubble slowly, as your water evaporates, it starts to change color very quickly!****
4. Once your sugar syrup is a nice caramel brown color, this happens in a matter of a few seconds, remove from the heat and place your saucepan in a heat resistant bowl of iced water to stop the cooking process. After one minute pour over your Crème Anglaise and Meringue Islands.
This is a delicious dessert and well worth the trouble. Make it for your self the first time and then try it out on your guests.
Creamy custard, meringue and crunchy caramel, the perfect combination!
CRÈME ANGLAISE :

Mix together your egg yolks, sugar and vanilla sugar.
Place wide saucepan of water on to boil, together with 185 g sugar to later simmer your meringue.

I keep a jar of sugar with vanilla pods in it permanently in the cupboard so that I have vanilla sugar always available.

In a saucepan to which you have added your vanilla pods, add your 500 ml of milk.
 Add your warmed milk stiring all the time. Add your 1/2 tsp corn flour, diluted in a tablespoon of milk. Sieve back into
clean saucepan and place over low heat . Now patiently stir over a low heat until it thickens. This can take 10-15
minutes.
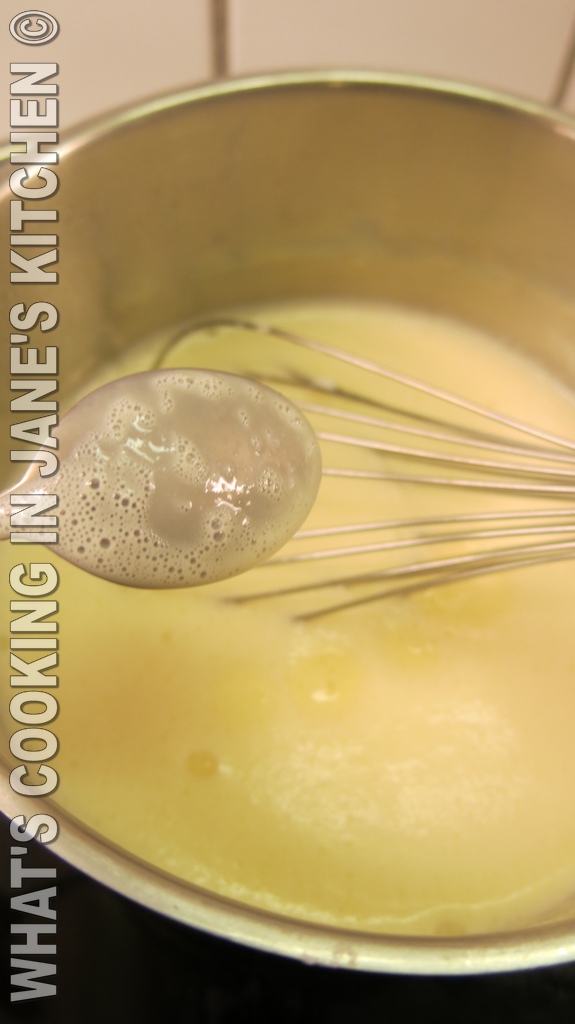
This picture shows that when tested with a spoon the custard is not yet thick enough. It must coat the back of the spoon.
The final thickness of your custard is similar to cream, before you beat it.
MERINGUE ISLANDS :
Make your meringue, by placing your whites only, (no yolk) in a spotless mixing bowl and beating until stiff peaks.
This means that the egg whites stand up in peaks when lifted with your switched off beater. If your peak is at all floppy
beat some more.Once this is achieved, add sugar and beat until smooth and shiny.

Using a tablespoon, dipped in cold water and with the help of a pallet knife, gently scoop onto your simmering syrup.
After 3-4 minutes carefully turn over. When cooking time is reached test with metal skewer, passing it gently through the
middle horizontally. It should be hot when placed on your hand. If only warm cook a little longer. If not thoroughly cooked your
meringue will shrink when removed from the water. Place on kitchen paper to drain. Then place on Crème Anglaise.
CARAMEL :

Having melted all your sugar crystals carefully, before the water comes to the boil, you then remove your spoon and let it
boil rapidly over a high heat.

As your syrup gets hotter, the bubbling will go quieter, a warning that soon it will change color. You want it just a little darker
than this, so that it is more tasty. Place saucepan into iced water to stop the cooking process. After three minutes pour over your dessert. in order for this to be crunchy do half an hour before serving. Any earlier and caramel will soften and not be crunchy.
***Always boil sugar with saucepan lid next to you in case of fire and never leave your boiling sugar unattended!**** See “Fire precautions under ” Viewpoint” in the Index to the right of this post.

Finally float your meringue on your Crème Anglaise and drizzle with caramel just before serving. If you look closely at
this picture you will see I only just didn’t “Scramble” the custard, because you can see at the edges it is almost separating.
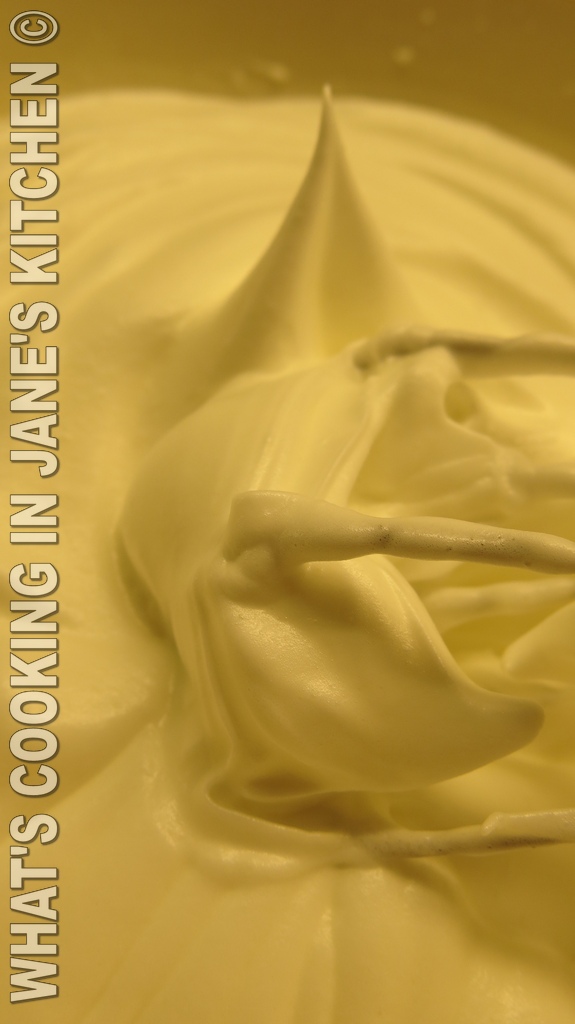
I have included this picture for you to see and if you compare it with the last picture you will see how your custard should
be……perfectly smooth.

I am also including this picture for you to see what happens to the caramel, if added 2-3 hours before serving. It has
softened. The flavor is still there and some people prefer it this way, but the best is when it is crunchy.
Now here is how it should be to perfection. Beautifully smooth custard and crunchy caramel!
Final Result! Delicious!
Ravioli Gnudi ©
When I was in my early twenties I moved to Italy for five years to learn Italian and study Interior Design. I lived in the beautiful city of Florence, the centre of art and design and it was not long before I entered the wonderful world of Italian Cooking.
Lectures always ended in time for lunch and just down the street from my Academia was a family run “Trattoria”…….By 2.30 p.m.this was a welcome break from drawing and the torrent of culture, so friends and I would invariably end up at the “Trattoria del Teatro,” where each day there was a delectable “Piatto del Giorno,” and this was the beginning of my getting to know Italian Cuisine.
When I left Florence, the architect who I had been working for, presented me with a charming Italian Cookery book and I have kept it with me all this time, often delving into it and enjoying the lovely drawings and recipes. here below I share with you one of my favourites.
Ravioli Gnudi .


The drawing may have you thinking several greens are included, but all though I am sure they would add flavour this recipe clearly states only the use of spinach.
“Ravioli Gnudi” get their name from the fact that the recipe is just the stuffing with out the pasta square around it and this particular recipe is a speciality of Arezzo. A perfect combination of spinach, eggs, flour, nutmeg, ricotta and parmesan cheese, beautifully covered with tomato sauce.

Easy, even if a little time consuming, but well worth the trouble!
Just the recipe to make when you have an hour to spare!
6 Persons
Ingredients
650 g fresh spinach
250 g Ricotta cheese
130 g flour
3 egg yolks
150 g Parmesan or Pecorino freshly grated
1/2 teaspoon freshly grated nutmeg
1/2 small onion finely grated
50 g butter
salt
Tomato Sauce
Either freshly grated tomato, if it is summer time with salt
OR
Tomato sauce made with:
2-4 cloves garlic
2 small chilli
600 g tin of chopped tomatoes
1 tbs olive oil
1 tsp salt
Extra parmesan for garnish
Method
1. Choose 700g of nice fresh tender leaves of spinach from your local market.
2. Soak spinach for five minutes in a large basin of water. Taking each individual spinach plant, remove any damaged or yellow leaves and cut off root with a sharp knife, leaving the leaves held together by the base of the stem.
3. Wash each spinach heart under running water, to get rid of any mud that might be lodged in between the leaves.
4. Place in a second bowl of salted water and leave another five minutes. The salt causes any bugs to release their grip and float to the surface. Change the water until there is no earth left in the bottom of your bowl, This is very important and can take at least 3-4 changes of water, depending on how muddy your spinach is, but you definitely don’t want any crunchiness in your end result! Drain briefly.
5. Using a large bag weigh out your spinach to 650 g and place in a large saucepan. Add a sprinkling of salt, place the lid on and allow it it cook over a medium heat, in just the water that remains in between the leaves after draining. There is no need to add any additional water, but keep an eye on it towards the end of the cooking time, that it doesn’t catch on the bottom of your saucepan. 15-20 minutes should be enough.
7. Remove spinach from heat and place on chopping board. You will notice in the photograph, nearly all the water has evaporated.
8. Using a large cooks knife, finely chop your spinach.
9. Measure and prepare the rest of your ingredients. Melt the butter in a clean saucepan and saute the onion for two minutes over a medium heat. Add your spinach and toss for five minutes. Remove from the heat and place the spinach in a large bowl and leave to slightly cool.
10. Start adding the rest of your ingredients to the spinach, ending up with the flour, which you should sieve in gradually, stirring all the time, so that no lumps form. Taste for salt and leave to cool.
11. Once the mixture has cooled, it is easier to work into small balls or oblongs 2 cm in length and 1 cm in width. It is important to keep them small, so that they cook quickly and thus the spinach does not over cook and remains a nice bright green.
12. Place on a baking tray and cover with cling film until ready to cook and eat.
13. In the mean time prepare your tomato sauce. Either grate fresh summer tomatoes and add a little salt, or alternatively, make a tasty tomato sauce, by gently frying sliced garlic and dried chilli in a tbs olive oil and before they begin to colour, add 600 g chopped tinned tomatoes. Bring to the boil, add a good teaspoon of salt and simmer until nearly all the liquid has evaporated. 15-20 minutes, lid off. Ideally pass through a sieve, this way you get a velvety sauce with no skin or seeds and it coats the Ravioli beautifully. Important to this basic and very tasty tomato sauce, taught to me by dear Signora Egilda, is to add plenty of salt to really bring the flavour out and knock the acidity and sweetness of the tomatoes. If you put very little salt, it simply is not nearly as tasty.
14. Once your guests are gathered, bring to the boil a wide saucepan of salted simmering water and add your ravioli 10 at a time, so that the water does not go off the boil.They will sink to the bottom, but after about five minutes, they will pop up to the surface and then they are cooked!
15. Place on kitchen paper in a warmed serving dish. This is important as you don’t want and water from the cooking diluting your sauce. Once all the ravioli are cooked, carefully remove the double sheet of kitchen paper and cover in hot tomato sauce.
16. Finally, just before placing on the table grate with extra parmesan and serve immediately!

This is what you are aiming for.


Wash heart under running tap.


Chop spinach finely along with stems. If there is an excess water drain in colander.

Gather together all your ingredients.

Nutmeg freshly ground is the best!


Roll into oblongs about 2 cm long 1 cm wide.

Cover with cling film until ready to be cooked. These can be made several hours before and stored in fridge.


Cover with hot tomato sauce.

Grate with plenty of parmesan.

And this is the final result!
Artichoke Avocado and Parmesan Pasta ©
Here is a great recipe for all those artichoke lovers out there! I love artichokes and they are now in season, so I decided to combine my two favorite things, artichokes and avocado and see what they would be like together. The result is a delicious creamy pasta.

Easy
4 Persons
Preparation Time : 20 minutes
Ingredients
1 medium onion
2 cloves garlic
25 g butter
390 g tin artichoke hearts in brine or fresh artichokes
1 ripe avocado
150 ml or more of cream (Light)
100 g grated parmesan
250 g Fusilli Pasta or other pasta of your choice
1/2 lemon juice
salt freshly grated black pepper
1 tbs chopped parsley and paprika for garnish
Method
1. Place salted pasta water onto boil. Place serving bowl and plates in oven to warm 50.C
2. Open your tin of artichoke hearts and soak in a bowl of water to get rid of brine.
If you have time, opt for fresh artichokes, boil globes in salted water, to which you have added 1 lemon juice, to stop artichokes from browning. The artichokes are ready when the point of a knife enters easily. 10-15 minutes, depending on size. Peel off leaves until you reach the white heart. Trim back center leaves and remove all ‘choke’ from center with a teaspoon. You will be left with the heart resembling the shape of a flying saucer!
3. Drain artichoke hearts upside down on kitchen paper and place in blender. Blend until smooth.
Once your pasta water is boiling add pasta. Try after eight minutes. It is important to cook it just enough, slightly firm and not over boil to soft.
4. Finely chop your onion and garlic and place in small saucepan together with butter and sweat over a low heat for 3-4 minutes stirring. Do not brown. Grate parmesan and finely chop parsley.
5. Add your artichokes, cream and seasoning and heat through. Do not boil. Remove from heat.
6. Lastly peel your avocado, add to blender together with lemon juice to prevent browning, blend and add to saucepan, together with parmesan. Place over heat, only to heat through, again do not boil.
5. As soon as your pasta is ‘al dente’ drain and place in heated serving bowl and add cream sauce. Mix well and sprinkle with finely chopped parsley and sweet paprika. This paprika is not hot. Tidy the sides of your dish with kitchen paper, so that the sides of your bowl are clean.
N.B. Essential to this recipe is the cream and lemon, otherwise the sauce browns with in five minutes. I use Fusilli pasta, because the grooves hold the sauce well.

This is what you are aiming for.

Gather together your ingredients, before you start cooking. Put salted pasta water onto boil and place serving dish and
plates in oven 50.C. to heat through.

Soak artichoke hearts in water for five to ten minutes to get rid of brine.

Drain on kitchen paper and place in blender.

Blend until nearly smooth.

Chop onions and garlic.

Add to saucepan with melted butter and sweat over a low heat for 3-5 minutes. Do not allow to brown.

Grate parmesan on fine grater.

Chop parsley.
When your pasta water comes to the boil add pasta. Boil rapidly for 8 minutes and then test for doneness. Don’t over
cook pasta, it should be ‘al dente,’ therefore have a little bite to it and not totally soft. When you over cook pasta, your dish
is then heavy.

Lastly peel avocado and add to blender together with lemon juice. I do this at the end, so that the avocado does not brown.

Blend until almost smooth.

Add blended artichokes to onions and garlic.Heat through, but do not boil.

Add blended avocado, cream and seasoning.

Add parmesan and mix well. Just heat through, again with out boiling.
Place drained pasta in pre- heated bowl, mix well with sauce and sprinkle with chopped parsley and paprika.
Delicious!
